Non-Toxic Snail/Slug Control for your Garden

A new, patented SNAIL-BARR®-ier for snail and slug control for your garden, orchard, potted plants, hothouses, nurseries and raised beds.
Once installed, it gives you protection for several years. It is especially useful in areas where toxic baits are not desired, such as around fruit trees, vegetable gardens, herb gardens, potted flowers and ornamentals.
It can protect large areas of your garden without any attention for several years, and it is not affected by rain or watering.
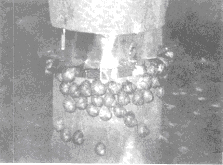
Snail or slug slime combine with the copper based barrier to create an electrolytic effect that repels snails and slugs. They accumulate below the barrier, enabling you to enjoy a snail-free garden.
WARNING! The barrier is made of thin, copper based metal and has sharp edges. Use gloves at all times during installation. Do not permit children to play with the barrier.
SNAIL-BARR® Garden Kit
DIRECTIONS FOR USE OF SNAIL-BARR®
SNAIL-BARR® can be installed with tabs on either top or bottom. The bottom configuration is preferred on trees and bushes for easier removal of snails. The top configuration is preferred on pots and other containers for ease of installation.
Snails will crawl over accumulated snails below the barrier. When two or three layers of snails have accumulated, removal and disposal of the snails is advised.
WARNING! PROTECTIVE GLOVES MUST BE USED WHILE HANDLING THE BARRIER MATERIAL.
TREES: SNAIL-BARR® is usually installed 12" to 16" above the ground on preferably a smooth part of the trunk.
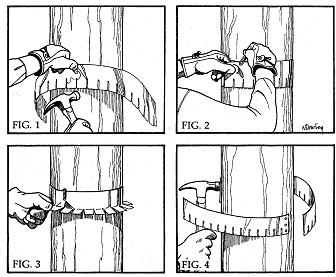
1. Measure the distance around the trunk with string or measuring tape.
2. Add 4" to 6" for expansion of the trunk (the average tree will grow this amount in 4 to 5 years).
3. Mark and cut with scissors.
4. Locate the center point of the barrier strip and position it against the trunk with the tabs pointed down (FIG. 1). Attach it to the trunk using two staples or three tacks. When using tacks, first push them through the copper, then tap them in with a hammer.
5. Wrap the barrier snugly around the trunk and secure the overlapped ends with a large 2" paper clip, attaching it about 3/4" from the free end of the barrier (FIG. 2).
6. Bend tabs up to the horizontal position (FIG. 3) and recheck for tightness.
7. Periodically check the barrier for tightness and to remove accumulated snails.
8. FOR LARGE DIAMETER TREES: After following notes 1, 2 and 3, cut the strip in half and staple one end to the trunk (FIG. 4) and do the same with the other half of the barrier half way around the trunk. Use two clips to attach barrier halves to each other.

POTS, PANS & CONTAINERS: The barrier is usually installed below the top edge, with tabs on top and even with,or just under the edge of the pot or container.
1. Measure the distance around the pot with string or measuring tape.
2. Add 2" for overlap, mark and cut with scissors.
3. Wrap barrier around pot with tabs pointed up and just above the rim. Secure the overlapped ends with a large 2" paper clip, attaching it about 3/4" from the free end of the barrier (FIG. 5).
4. Bend the free end of the barrier back over the paper clip (FIG 6).
5. With a twist-tie wire, form a "U" shape to fit around one of the tabs.
6. Place the formed wire around the tab and bend the tab to the horizontal position.
7. Bend the free ends of the wire over the lip of the pot and push them into the soil (FIG. 7).
8. Install 3 or 4 wires around the pot in this manner and bend ALL the tabs in the horizontal position (FIG. 8).
9. Check barrier to see that it fits snugly around pot.
RECTANGULAR, HEXAGONAL AND OCTAGONAL WOODEN CONTAINERS:
1. Measure the distance around the container with string or with a measuring tape.
2. Add 11/2" for overlap. Mark and cut with scissors.
3. Position the barrier with the tabbed edge up and with the tabs just above the container edge. Tack or staple the other edge to the containers, spacing the tacks every 5" or 6" as you wrap the barrier around the container.
4. On tapered containers, secure the overlapped ends with a large 2" paper clip.
5. Bend the tabs outward to the horizontal position. If spacing of the tabs does not match the container corners, split the tab with scissors before bending them out.
GARDEN WALLS AND FENCES: On wall and fences, the barrier is attached to a wooden plank. For permanent installation, the plank is attached to the wall or laid on top of the wall, or on the ground near the wall.
PORTABLE FENCES: SNAIL-BARR® is attached to the planks by tacks or staples. Four planks with hook & eye catches form a rectangular frame, protecting groups of pots. It is very useful if plants are overhanging to the ground. Provides temporary overnight protection when snails are most active. Disassemble and store when not in use.
RAISED BEDS AND LARGE PLANTERS: The barrier is tacked or stapled to the wooden frame around the raised bed or planters, providing permanent protection for your vegetable or herb garden for many years.
WARNING! The barrier is made of thin, copper based metal and has sharp edges. Use gloves at all times during installation. Do not permit children to play with the barrier.
NOTICE: SELLERS MAKE NO WARRANTY, expressed or implied, concerning the use of this product other than is indicated on the label. Buyer assumes all risk of use and handling of this material when such use and handling is contrary to these instructions.
U.S. PATENT #4,471,562 Other Patents Pending
Other Slug & Snail Control Products
Bulletin about Decollate Snails
Snailer
|
